
Hummus Growth Guide
Learn how to make hummus thrive with these 3 tips.
Chickpeas
Tahini
Lemon Juice
Olive Oil
Garlic
Plant chickpeas in fertile soil.
Water your chickpeas regularly.
Ensure your chickpeas get plenty of sunlight.
Why Homemade Hummus Will Change Your Dip Game Forever
Have you ever wondered why store-bought hummus never tastes as fresh and creamy as the one from your favorite Mediterranean restaurant? The secret is simple: it’s almost always better when you make it yourself. Cooking at home puts you in control of the texture, seasoning, and quality of ingredients. Whether you’re a seasoned cook or a kitchen beginner, preparing this classic dip from scratch is easier than you think and delivers unmatched flavor. In this guide, we’ll walk you through everything you need to know about making the perfect Hummus at home. And if you’re looking for a full meal idea, don’t miss our Hummus recipe featured later in this post.
Homemade hummus is not only cost-effective but also free from preservatives and overly processed oils. You can adjust the garlic, lemon, or tahini to suit your taste perfectly. Plus, it takes less than 15 minutes of active work. Let’s dive into the details so you can whip up a batch of this creamy, protein-packed dip whenever you crave it.
—
Ingredients & Kitchen Tools
Core Ingredients
– 1 can (15 oz) chickpeas – Also called garbanzo beans. Rinse and drain well. For extra creaminess, peel the skins off (optional but recommended).
– ¼ cup tahini – Sesame seed paste. Stir before using as the oil often separates.
– 2–3 tablespoons lemon juice – Freshly squeezed is best for bright flavor.
– 1 small garlic clove – Crushed or minced. Adjust to your garlic tolerance.
– 2–3 tablespoons ice water – Helps achieve a silky smooth texture.
– Salt – To taste, typically about ½ teaspoon.
– Optional: 2 tablespoons olive oil – Added for richness, but can be omitted for a lower-fat version.
Kitchen Tools
– Food processor or high-speed blender – Essential for a smooth consistency.
– Fine-mesh strainer (if peeling chickpeas).
– Rubber spatula – To scrape down sides.
– Small bowl and fork – For mixing tahini and lemon juice beforehand.
– Measuring spoons and a can opener.
Substitutions
– No tahini? Use sunflower seed butter or Greek yogurt (though flavor will change).
– Garlic-free? Skip it or use roasted garlic for a milder taste.
– Oil-free? Simply omit olive oil; the hummus stays creamy thanks to the chickpeas and tahini.
—
Prep Time & Cooking Schedule
– Prep time: 10 minutes (includes rinsing chickpeas, squeezing lemon, and measuring ingredients).
– Active blending time: 3–5 minutes.
– Optional resting time: 15–30 minutes at room temperature to allow flavors to meld.
No cooking or baking is required, which makes this the perfect last-minute appetizer. Plan ahead if you want to peel the chickpeas (adds 5–10 minutes), but it’s not mandatory for a good result. Resting time is not essential, but it does improve the taste, especially if you’re serving later.
—
Step-by-Step Instructions
1. Prepare the tahini base – In a small bowl, whisk the tahini with lemon juice until smooth. The mixture will thicken slightly – that’s normal.
2. Process the garlic – Add the crushed garlic to the food processor and pulse a few times until finely chopped.
3. Add chickpeas – Pour in the drained chickpeas. Process for 30 seconds until broken down.
4. Incorporate the tahini mixture – Add the tahini-lemon blend, salt, and 2 tablespoons of ice water. Blend for 1–2 minutes, scraping sides as needed.
5. Adjust texture – If the hummus is too thick, add another tablespoon of ice water and blend again. You want a smooth, almost whipped consistency.
6. Season to taste – Add more salt, lemon juice, or garlic as desired. Blend once more.
Pro tip: For the creamiest Hummus, warm the chickpeas slightly (microwave for 30 seconds) before blending. Heat helps break down the starches.
Once you master this base, you can try a more elaborate Hummus recipe like the one we linked above – it pairs beautifully with roasted vegetables or grains.
—
Nutritional Benefits & Advantages
Chickpeas are a fantastic source of plant-based protein (about 7 grams per ¼ cup) and dietary fiber, which supports digestion and satiety. Tahini adds healthy unsaturated fats, calcium, and iron. Lemon juice provides vitamin C, helping your body absorb the iron more effectively.
Hummus is naturally vegan, gluten-free, and dairy-free. It fits into Mediterranean, vegetarian, and flexitarian diets. The absence of added sugars and refined oils (if you choose oil-free) makes it a nutrient-dense snack. Studies show that regular consumption of legumes like chickpeas can help manage blood sugar levels and reduce the risk of heart disease.
—
Tips, Variations & Cooking Advice
– Flavor variations: Add roasted red peppers, sun-dried tomatoes, or a pinch of smoked paprika for a twist.
– Herb hummus: Blend in fresh parsley, cilantro, or basil for a green version.
– Spicy hummus: Add a small jalapeño or a dash of cayenne pepper.
– Texture tweaks: If your hummus turns out grainy, it’s often because the tahini wasn’t emulsified well. Always mix tahini with lemon juice first.
– Dietary adaptations: For a lower-fat version, reduce tahini to 2 tablespoons and replace with additional chickpeas or a bit of plain unsweetened yogurt (if not vegan).
—
Common Mistakes to Avoid
1. Skipping the ice water – This is the secret to airy, creamy hummus. Without it, your hummus will be dense and pasty.
2. Using cold chickpeas directly from the fridge – Cold chickpeas don’t break down as smoothly. Warm them slightly as mentioned.
3. Overloading garlic – Raw garlic can be overpowering. Start with one small clove and adjust.
4. Not draining chickpeas well – Excess liquid leads to watery hummus. Drain thoroughly.
5. Over-blending without scraping – This heats up the mixture and can make it less creamy. Pause to scrape sides.
—
Storage & Meal Prep Tips
– Refrigeration: Store hummus in an airtight container for up to 5–7 days. Press a piece of plastic wrap directly onto the surface to prevent a skin from forming.
– Freezing: Hummus freezes well for up to 3 months. Portion into small containers, leaving headroom for expansion. Thaw overnight in the fridge, then stir.
– Reheating: Hummus is best served at room temperature or cold. If you prefer it warm, microwave in short bursts (15 seconds) and stir gently. Avoid high heat as it can separate.
– Meal prep: Make a double batch on Sunday and use it as a dip, spread on wraps, or alongside roasted vegetables all week.
—
Conclusion
Making your own Hummus is a rewarding, quick, and healthy kitchen project that elevates any meal. By following the simple steps above, you’ll have a dip that’s far superior to anything from a tub. We encourage you to experiment with different flavors and share your results – tag us or leave a comment below. And if you’re ready for a complete meal, try our featured Hummus recipe that turns this dip into a satisfying bowl.
Now go blend, dip, and enjoy!
—
Frequently Asked Questions
1. Can I use dried chickpeas instead of canned?
Yes. Soak ½ cup dried chickpeas overnight, then cook until tender (about 1–1.5 hours). Drain and use as you would canned. The cooking liquid (aquafaba) can replace some ice water for even creamier hummus.
2. My hummus is too thick – how do I fix it?
Add cold water or lemon juice one tablespoon at a time while blending. Adjust salt accordingly.
3. Why is my hummus bitter?
Bitterness often comes from old or over-toasted tahini. Taste your tahini before using. If it’s bitter, try a different brand, or add a pinch of sugar to balance. Also, too much lemon juice can cause bitterness.
4. Can I make hummus without a food processor?
Yes, but it requires more effort. Use a mortar and pestle to mash chickpeas slowly, or a blender with a little extra liquid. The texture may be slightly grainier.
5. How long does homemade hummus keep at room temperature?
For safety, don’t leave it out longer than 2 hours. Always refrigerate leftovers. When serving, place the bowl over a small dish of ice to keep it cool during parties.

How to grow Hummus with 3 tips
Equipment
- Food processor
- Large pot
- Serving bowl
Ingredients
Main Ingredients
- 1 cup Chickpeas dried
- 1/4 cup Tahini
- 2 tablespoons Lemon juice
- 1 clove Garlic
- 1/2 teaspoon Salt
- 2 tablespoons Cold water
Garnish (Optional)
- 1 tablespoon Olive oil
- 1/2 teaspoon Paprika
- 2 tablespoons Parsley freshly chopped
Instructions
Growing Chickpeas
- Tip 1: Grow your chickpeas in well-drained soil with plenty of sunlight, ensuring they get consistent moisture for optimal growth.
- Tip 2: Harvest chickpeas when the pods are plump and dry, typically around 100 days after planting, allowing them to fully mature on the vine.
- Tip 3: Shell the dried chickpeas and soak them overnight in cold water to rehydrate them, preparing them for cooking.
Making the Hummus
- Cook the rehydrated chickpeas in boiling water for 90 minutes until very tender, then drain and set aside some cooking liquid.
- In a food processor, combine the cooked chickpeas, tahini, lemon juice, garlic, and salt; blend until smooth.
- Gradually add cold water and reserved cooking liquid, blending until the hummus reaches a creamy consistency.
Serving
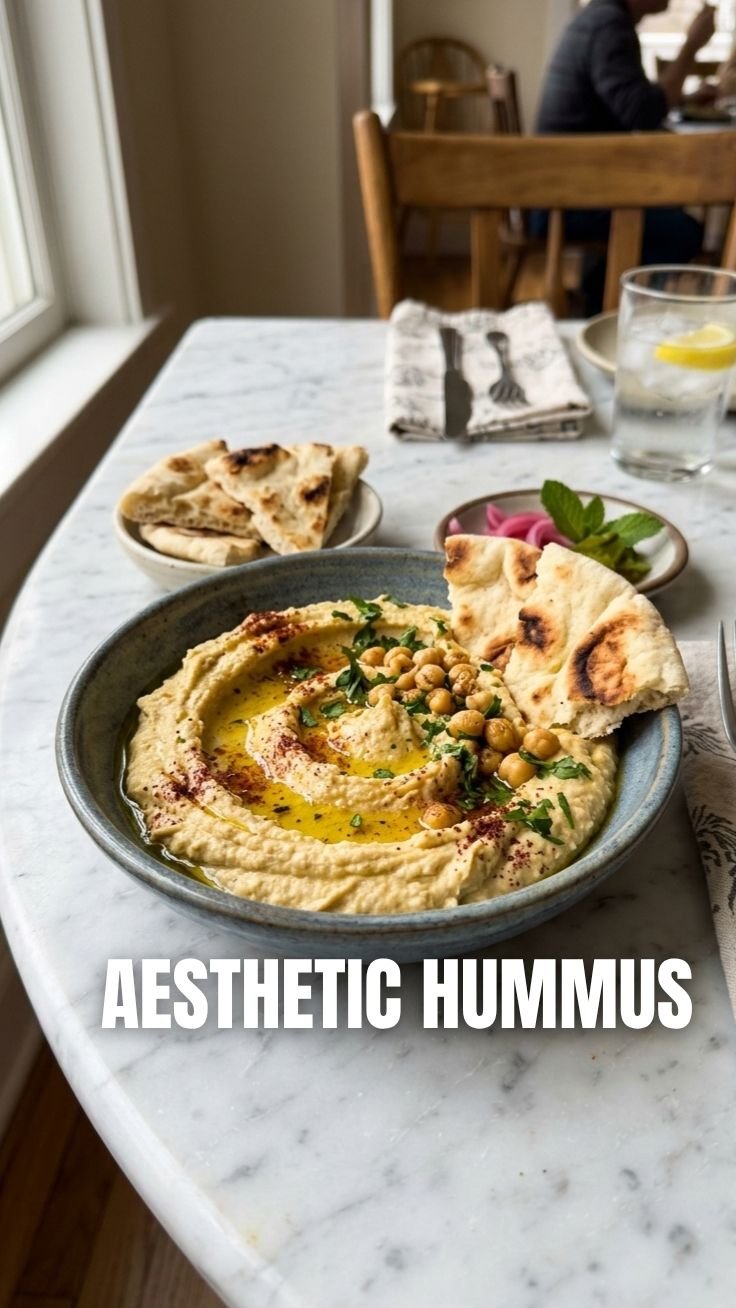
- Transfer the hummus to a serving bowl, create a swirl in the center, and drizzle with olive oil.
- Garnish with paprika and freshly chopped parsley for added flavor and presentation.