How to Make the Best 7-Layer Dip with 7 Ingredients
Learn how to create a delicious 7-layer dip with just seven simple ingredients.
Refried beans
Sour cream
Salsa
Guacamole
Shredded cheese
Tomatoes
Green onions
Spread a layer of refried beans on the bottom of a dish.
Chop the tomatoes and green onions into small pieces.
Layer the guacamole on top of the refried beans.
Sprinkle a layer of shredded cheese over the guacamole.
Spread a layer of sour cream on top of the cheese.
Pour a layer of salsa over the sour cream.
Sprinkle the chopped tomatoes and green onions on top of the salsa.
The Ultimate 7-Layer Dip: A Crowd-Pleasing Mexican Appetizer That Steals the Show
Have you ever walked into a party, glanced at the snack table, and felt your heart skip a beat when you spotted that glorious layered dish? You know the one—the creamy, chunky, slightly spicy, and utterly irresistible creation that disappears faster than any other platter. That’s the magic of a well-made 7-Layer Dip. This iconic dish isn’t just a party starter; it’s a conversation piece, a flavor symphony, and the reason people linger by the buffet table. Preparing it at home isn’t just valuable—it’s essential. You control the quality of every layer, from the freshness of the guacamole to the heat of the salsa, ensuring a restaurant-quality result without leaving your kitchen. Plus, mastering this recipe opens the door to creating countless variations of other Mexican appetizers that will make you the go-to host for every gathering.
Ingredients & Kitchen Tools
Before diving in, gather everything you need. Precision here makes assembly seamless.
Required Ingredients
– 1 can (16 oz) refried beans: The base layer. Choose traditional or vegetarian. Tip: Warm slightly for easier spreading.
– 1 cup sour cream: Adds tangy creaminess. Greek yogurt works as a substitute.
– 1 packet (1 oz) taco seasoning: Mix with sour cream for a spiced layer. Homemade blend works too.
– 1 cup guacamole: Store-bought or homemade. Look for chunky style for texture.
– 1 cup salsa: Medium heat is standard. Drain excess liquid to avoid a watery dip.
– 1 cup shredded cheddar cheese: Sharp cheddar melts beautifully. Monterey Jack or a Mexican blend are great alternatives.
– 1/2 cup sliced black olives: Adds briny contrast. Omit if not a fan.
– 1/2 cup chopped green onions: For freshness and color. Chives are a fine swap.
– 1/2 cup diced tomatoes: Seeded and drained to prevent sogginess. Roma tomatoes work best.
Kitchen Tools
– 9×13-inch glass dish or a large pie plate for clear layers.
– Spatula for smooth spreading.
– Small mixing bowl for the sour cream mixture.
– Chef’s knife and cutting board for prep.
– Measuring cups and spoons for accuracy.
Optional Substitutions
– Vegan: Use plant-based sour cream, vegan cheese, and bean-based refried beans.
– Gluten-free: Confirm taco seasoning is GF; most are.
– Low-fat: Use light sour cream and reduced-fat cheese.
Prep Time & Cooking Schedule
This dip is a no-cook marvel, but planning ensures peak freshness.
– Prep Time: 20 minutes
– Chill Time: Minimum 30 minutes (recommended 1-2 hours)
– Total Time: About 50 minutes to 2 hours 20 minutes
Context: This dip is best made at least an hour before serving to allow flavors to meld. You can prep it the night before—just cover tightly and refrigerate. Add tomatoes and green onions right before serving for maximum crunch.
Step-by-Step Instructions
Follow these steps precisely for beautiful layers and balanced flavors.

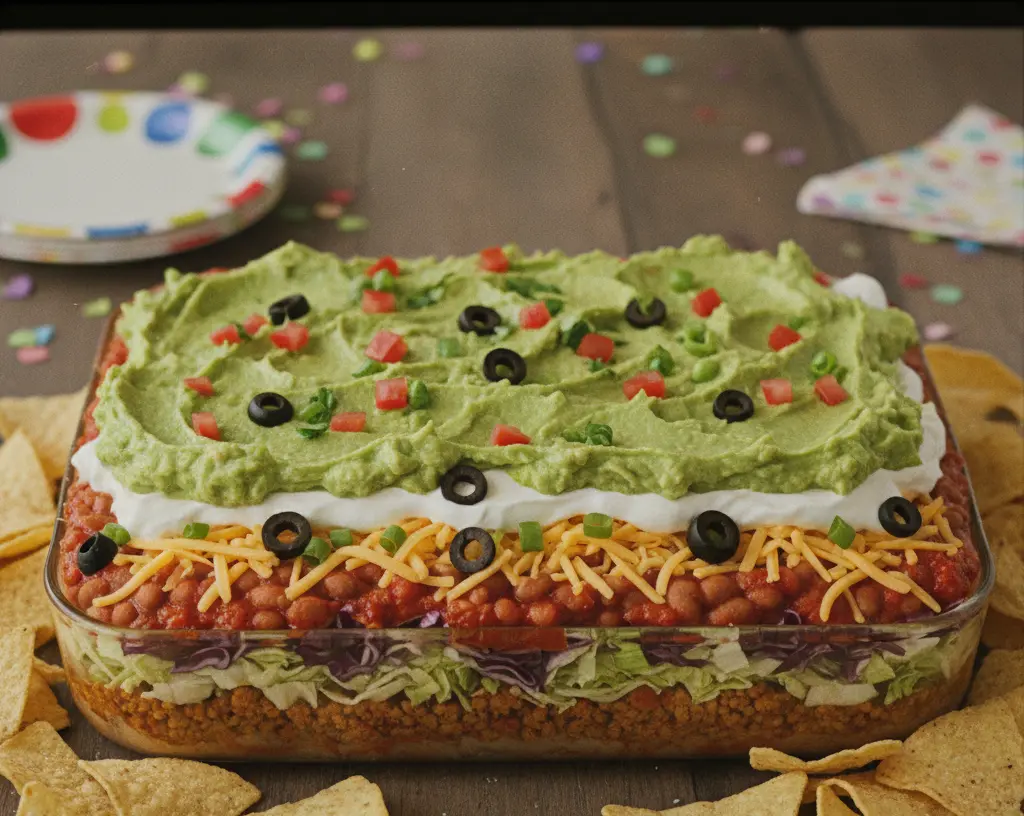
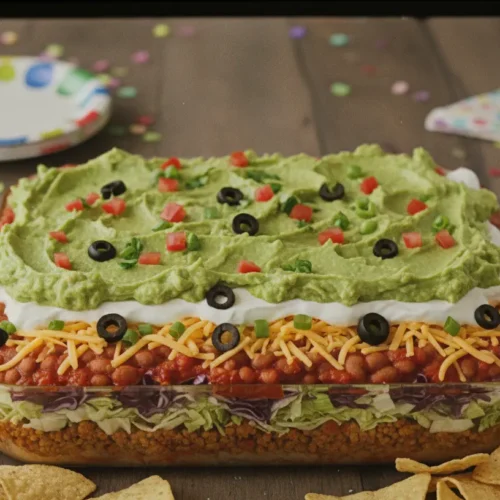
1. Layer 1: Refried Beans – Spread the refried beans evenly across the bottom of your dish. If they’re too stiff, microwave for 15-20 seconds until spreadable. Tip: A warm base prevents cracking.
2. Layer 2: Sour Cream Mixture – In a small bowl, mix 1 cup sour cream with 1 tablespoon taco seasoning (or more to taste). Spread gently over beans, being careful not to mix them.
3. Layer 3: Guacamole – Spoon guacamole over the sour cream and spread carefully. Texture cue: Leave some lumps for visual appeal and varied mouthfeel.
4. Layer 4: Salsa – Spoon salsa over guacamole. Drain any excess liquid from the jar first. Temperature control: Use room-temperature salsa to avoid shocking the layers.
5. Layer 5: Shredded Cheese – Sprinkle cheddar evenly over salsa. This acts as a barrier, keeping toppings fresh.
6. Layer 6: Black Olives – Distribute olives over the cheese. Seasoning adjustment: If using salted olives, reduce salt elsewhere.
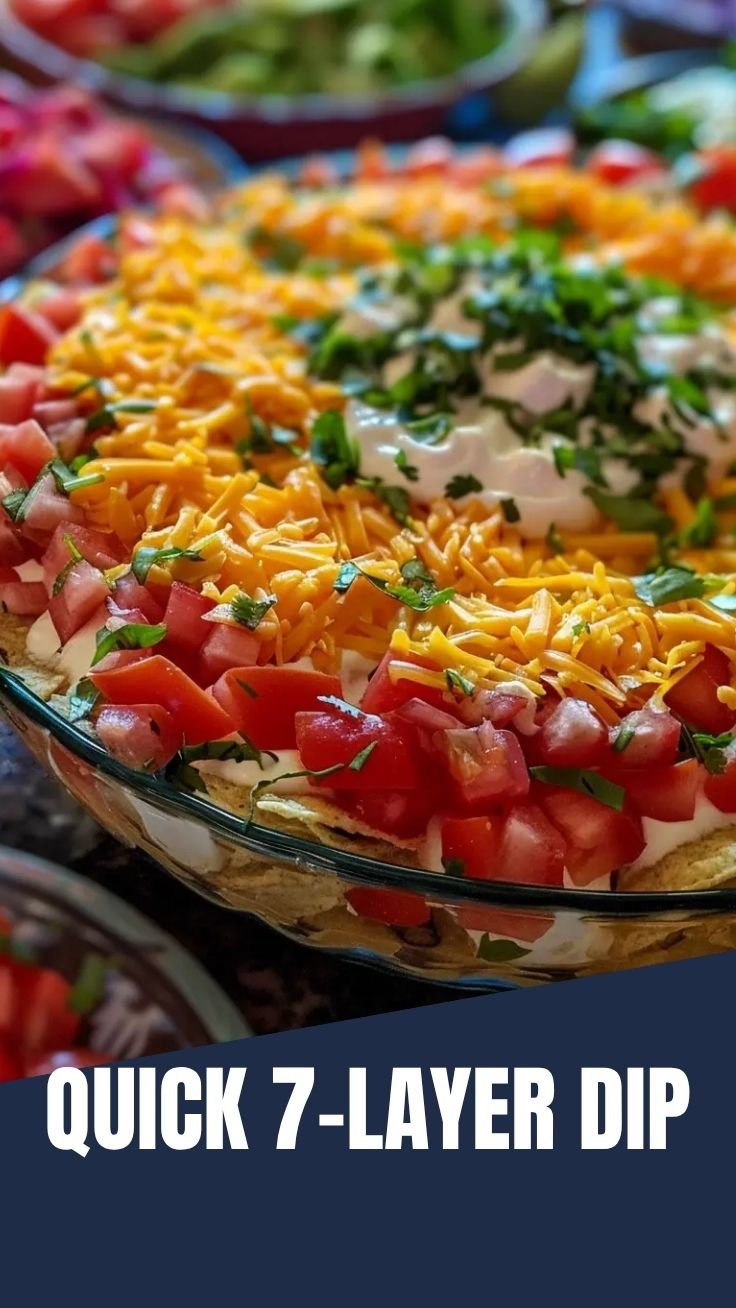
7. Layer 7: Green Onions & Tomatoes – Finish with green onions and diced tomatoes for color and crunch. Ingredient handling: Pat tomatoes dry with paper towels to prevent watery dip.
When layering your next batch of 7-Layer Dip, remember that patience yields the best results. Similarly, when exploring other Mexican appetizers, the same attention to layering and fresh ingredients will elevate your entire spread.
Nutritional Benefits & Advantages
This dip isn’t just delicious—it packs surprising nutritional perks.
– Refried Beans: High in fiber and plant-based protein, supporting digestive health and satiety. Choose low-sodium versions for better blood pressure management.
– Guacamole: Rich in heart-healthy monounsaturated fats from avocados, plus vitamins C, E, K, and B-6. Antioxidants like lutein support eye health.
– Salsa: Lycopene from tomatoes is a powerful antioxidant linked to reduced cancer risk. Capsaicin from peppers may boost metabolism.
– Sour Cream: Provides calcium and probiotics (if using live culture versions). Swap for Greek yogurt for extra protein.
– Olives: Contain healthy fats and vitamin E, beneficial for skin health.
Per serving (about 1/8 of the recipe): Approx. 250-300 calories, 15g fat, 20g carbs, 8g protein, 5g fiber. It’s a filling, nutrient-dense snack that satisfies cravings without processed fillers.
Tips Variations & Cooking Advice
Customize this dip to fit your taste or dietary needs.
– Spice It Up: Add diced jalapeños or chipotle peppers to the sour cream layer. Use hot salsa instead of medium.
– Go Tex-Mex: Layer in seasoned ground beef or shredded chicken between beans and sour cream. Method change: Use a tortilla scooper for extra thickness.
– Dairy-Free Option: Use cashew-based sour cream or dairy-free yogurt. Nutritional yeast can replace cheese for a cheesy flavor.
– Gluten-Free Check: Most tortilla chips are naturally GF, but double-check labels. Serve with veggie sticks like cucumber or bell pepper strips.
– Portion Adaptation: For a smaller crowd, use an 8×8-inch dish and halve all ingredients proportionally.
– Flavor Variation: Swap salsa for pico de gallo for chunkier texture. Add a layer of pickled jalapeños for acidity.
Common Mistakes to Avoid
Avoid these pitfalls for a perfect dip every time.
1. Watery Dip from Soggy Toppings – Solution: Drain salsa and pat tomatoes dry before adding. Don’t add juicy toppings too far in advance.
2. Muddy Layers from Overmixing – Solution: Spread each layer gently, using a spatula in a single direction. Let the dish chill between layers if needed.
3. Limp Guacamole from Browning – Solution: Press plastic wrap directly onto guacamole layer before adding salsa. The acid in salsa also helps preserve color.
4. Too Much Salt – Solution: Use low-sodium versions of beans, salsa, and olives. Taste sour cream mixture before adding.
5. Bland Flavor from Underseasoning – Solution: Always season sour cream with taco seasoning. Add a pinch of salt and cumin to beans if using plain ones.
Storage & Meal Prep Tips
Keep your dip fresh and safe for leftovers.
– Refrigeration: Cover tightly with plastic wrap or an airtight lid. Will keep for 2-3 days. Important: The guacamole may darken slightly but remains safe to eat.
– Freezing: Not recommended. Freezing will cause sour cream to separate and tomatoes to become mushy. Freeze individual components (beans, salsa) separately instead.
– Reheating: This dip is served cold or at room temperature. If you prefer it slightly warmed, microwave individual portions in 15-second bursts, but know texture will change.
– Meal Prep Tip: Assemble layers 1-4 (beans through salsa) up to 24 hours ahead. Add cheese, olives, and toppings just before serving for maximum freshness.
– Transportation: For parties, assemble in a disposable aluminum pan with a tight lid. Carry chilled, then add final toppings at the venue.
Conclusion
Mastering the 7-Layer Dip is about more than following a recipe—it’s about creating a centerpiece that brings people together. With its creamy, crunchy, spicy, and cool layers, it’s no wonder this dish dominates party tables across the country. By preparing it at home, you guarantee freshness, customize the heat, and avoid preservatives. Whether you’re serving it alongside other Mexican appetizers like taquitos or quesadillas, or letting it shine solo, this dip will earn you repeated requests. So grab your ingredients, layer with love, and watch it vanish. Share your results in the comments—I’d love to hear your favorite variation!
FAQs
Q: Can I make this dip vegan?
A: Absolutely. Use plant-based sour cream (like Tofutti or Kite Hill), dairy-free cheese shreds, and vegan refried beans. The rest is already plant-based.
Q: How do I prevent the guacamole from turning brown?
A: Press plastic wrap directly onto the guacamole layer before adding salsa. The acid in the salsa also helps. Alternatively, add a squeeze of lime juice to the guacamole.
Q: Can I use homemade refried beans?
A: Yes! Homemade beans often have better texture. Just ensure they’re thick enough to hold layers—mash well and cook down excess liquid.
Q: Why is my dip watery after sitting out?
A: Tomatoes and salsa release moisture over time. Drain them well before adding, and consider adding tomatoes right before serving. Using a thicker salsa helps too.
Q: How long can this dip sit out at a party?
A: For food safety, don’t leave it out for more than 2 hours (1 hour if above 90°F). Serve in smaller bowls and replenish from the fridge as needed.
7-Layer Dip
Equipment
- Serving dish
Ingredients
Main Ingredients
- 1 can refried beans (15 oz)
- 1 cup guacamole
- 1 cup sour cream
- 1 cup salsa
- 1 cup shredded cheddar cheese
- 0.5 cup sliced black olives
- 0.25 cup green onions sliced
Instructions
Assembly
- Spread the refried beans evenly onto the bottom of a serving dish.
- Carefully spread the guacamole over the bean layer.
- Gently spread the sour cream as the third layer.
- Spoon the salsa over the sour cream.
- Sprinkle the shredded cheese evenly over the salsa.
- Top with the sliced black olives.
- Garnish with the sliced green onions and serve immediately with tortilla chips, or cover and refrigerate for later.