- Prep the shrimp – Pat dry, season, and toss in a lemon‑butter mixture.
- Sauté – Cook shrimp in a hot skillet until just pink.
- Build the toppings – Shred cabbage, dice mango, whip up a quick crema.
- Warm the tortillas – Lightly char on a pan or grill for authentic texture.
- Assemble & serve – Layer shrimp, toppings, and a drizzle of sauce, then enjoy.
Having this visual in mind helps you move through the steps without missing a beat.
—Ingredient list
20‑Minute Lemon Shrimp Tacos: 5 Easy Steps to Perfect Mexican CuisineIngredient Amount Notes / Substitutions Large raw shrimp, peeled & deveined 1 lb (≈ 450 g) Look for “wild‑caught” for extra flavor; frozen works if thawed thoroughly. Unsalted butter 2 Tbsp Can replace with olive oil for a lighter profile. Fresh lemon juice 2 Tbsp Substitute lime juice for a tangier Mexican twist. Zest of 1 lemon 1 tsp Adds bright aroma; optional. Smoked paprika 1 tsp Regular paprika works, but smoked adds depth. Ground cumin ½ tsp Chili powder ¼ tsp Adjust to taste or omit for low‑heat version. Salt ½ tsp (or to taste) Black pepper ¼ tsp Corn tortillas (6‑inch) 8 pieces Small‑flour tortillas also fine. Red cabbage, thinly sliced 1 cup For crunch; can use green cabbage. Mango, diced ½ cup Optional sweet contrast; pineapple works too. Fresh cilantro, chopped ¼ cup Red onion, thinly sliced ¼ cup Avocado, sliced 1 medium Sour cream or Greek yogurt ¼ cup Base for crema. Lime juice (for crema) 1 Tbsp Salt (for crema) Pinch Hot sauce (optional) To taste Tabasco, Cholula, or a smoky chipotle sauce.
Tip: If you’re feeding a crowd, simply double the shrimp and topping quantities; the cooking time stays the same.
—Step‑by‑step instructions
Step 1 – Season the shrimp Pat the shrimp dry with paper towels. In a bowl, combine butter, lemon juice, lemon zest, smoked paprika, cumin, chili powder, salt, and pepper. Toss the shrimp until each piece is lightly coated.
Step 2 – Heat the pan Place a large skillet over medium‑high heat. Once hot (a few drops of water should sizzle), add the seasoned shrimp in a single layer. Cook for 2‑3 minutes per side, until the shrimp turn pink and opaque. Remove from heat and set aside.
Step 3 – Prep the toppings While the shrimp cook, whisk together sour cream (or Greek yogurt), lime juice, and a pinch of salt to create a silky crema. Transfer the shredded cabbage, diced mango, sliced red onion, and chopped cilantro into a bowl. Toss lightly with a drizzle of olive oil, a squeeze of lime, and a pinch of salt.
Step 4 – Warm the tortillas Stack the corn tortillas and heat them in a dry skillet for 30 seconds per side, or until they puff slightly and develop golden spots. Keep them wrapped in a clean kitchen towel to stay warm.
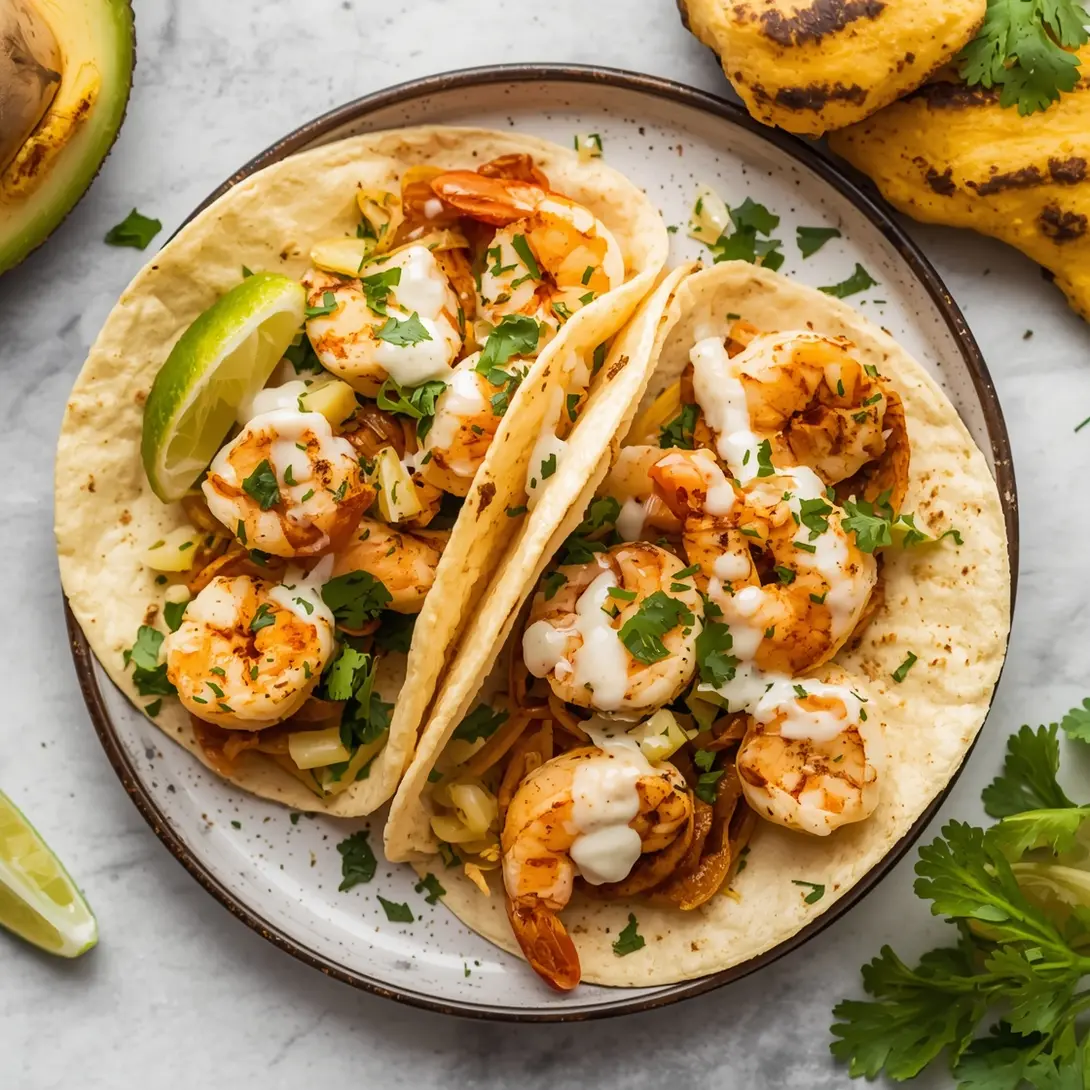
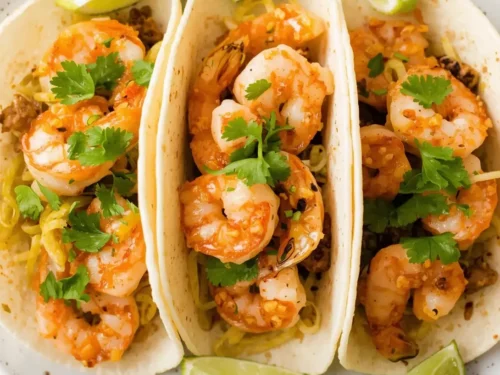
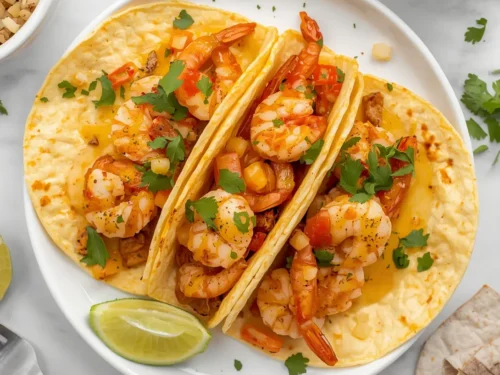
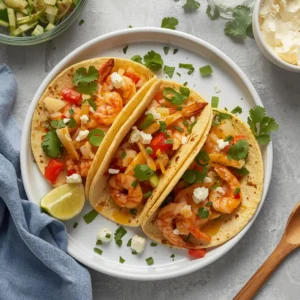
Step 5 – Assemble the tacos Place 3‑4 shrimp in the center of each tortilla. Top with a generous spoonful of the cabbage‑mango slaw, a few avocado slices, and a drizzle of the lime crema. Finish with extra cilantro and a dash of hot sauce if desired. Serve immediately while the shrimp are still sizzling.
Pro tip: For an extra burst of citrus, zest a little lemon over the finished tacos just before serving.
—What to serve it with
- Mexican street corn (elote) – Grilled corn on the cob brushed with mayo, cotija, chili powder, and lime. The creamy, spicy side balances the shrimp’s brightness.
- Black bean and corn salad – A simple mix of black beans, corn, diced tomato, red onion, cilantro, and lime dressing adds protein and texture.
- Tropical fruit salsa – Diced pineapple, jalapeño, red onion, and cilantro tossed with lime juice gives a sweet‑heat contrast ideal for shrimp.
- Cilantro‑lime rice – Fluffy white rice tossed with fresh cilantro, lime zest, and a splash of lime juice offers a mellow base that absorbs any extra sauce.
Plating suggestion: Arrange the tacos on a wooden board or a vibrant plate, line the side with a small mound of slaw, and drizzle an extra swirl of crema over the board for a restaurant‑style finish. Add a wedge of lemon on the side for an elegant pop of color.
—The best way to save extras
* Refrigerate: Transfer any leftover shrimp and toppings into airtight containers. Store the shrimp separate from the slaw (to avoid sogginess). They’ll stay fresh for 2 days. * Reheat: Warm the shrimp gently in a skillet over low heat for 1‑2 minutes—avoid high heat to prevent rubbery texture. * Freeze: The cooked shrimp can be frozen on a parchment‑lined tray for up to 3 months. Once solid, transfer to a zip‑top bag. Thaw overnight in the fridge and reheat as above. The slaw and crema are best consumed fresh; however, you can freeze the slaw in a separate bag for later use, although texture may soften. * Food safety: Keep shrimp chilled below 40 °F (4 °C) and never leave cooked seafood at room temperature for more than 2 hours.
—Helpful cooking tips
Tip Why it matters Pat the shrimp dry Moisture creates steam, which prevents a good sear. Dry shrimp browns faster, locking in flavor. Don’t overcrowd the pan Overcrowding drops the temperature, resulting in soggy shrimp. Cook in batches if needed. Use a splash of white wine Adding 1 Tbsp of dry white wine after the butter melts deglazes the pan, boosting depth without extra fat. Finish with a squeeze of fresh lemon A final burst of acidity revives the citrus notes after cooking. Warm tortillas on the grill Charred edges add a smoky note that mimics authentic Mexican street tacos. Taste the crema before adding salt Yogurt or sour cream can vary in saltiness; adjust at the end for perfect balance.
—Creative twists
- Spicy chipotle‑marinated shrimp – Swap the lemon butter for a chipotle‑adobo sauce mixed with lime juice. The smoky heat pairs nicely with a cooling cucumber slaw.
- Coconut‑lime shrimp – Add 1 Tbsp coconut oil and a dash of coconut milk to the butter mixture; finish with toasted coconut flakes for a tropical vibe.
- Plant‑based swap – Use large king oyster mushroom slices or seasoned tempeh strips in place of shrimp; the cooking steps stay identical.
- Mediterranean flair – Replace the taco seasoning with oregano, garlic powder, and a pinch of smoked sea salt. Top with feta crumbles and a drizzle of tzatziki.
- Breakfast version – Serve the shrimp on a soft flour tortilla topped with scrambled eggs, avocado, and salsa verde for a hearty brunch taco.
—FAQ
Q: How long does it actually take to prep and cook? A: The prep (slicing cabbage, dicing mango, mixing crema) takes about 8 minutes, and the shrimp cook for 4‑5 minutes total. Add 2‑3 minutes for warming tortillas, so you’re comfortably within the promised 20‑minute window.
Q: Can I use frozen shrimp directly from the bag? A: Yes, but thaw them first for even cooking. Place frozen shrimp in a colander, run cold water over them for 5‑7 minutes, then pat dry. Skipping thawing can cause the butter to splatter and the shrimp to cook unevenly.
Q: Are these tacos gluten‑free? A: Absolutely—corn tortillas are naturally gluten‑free. Just double‑check any pre‑made sauces or seasonings for hidden wheat. If you prefer flour tortillas, choose a certified gluten‑free brand or stick to the corn version for a traditional texture.
—
Bottom line: In just 20 minutes you can create a plate brimming with sunshine, surf, and spice. The 20‑Minute Lemon Shrimp Tacos prove that a quick dinner doesn’t have to be bland. Whether you’re feeding a family, impressing friends, or simply craving a taste of the coast, these tacos deliver flavor, simplicity, and a pinch of culinary adventure—all on a humble tortilla. Grab your skillet, squeeze that lemon, and let the fiesta begin!
Classic 20-Minute Lemon Shrimp Tacos
These classic lemon shrimp tacos are ready in just 20 minutes, featuring succulent shrimp seasoned with paprika, cumin, and chili powder, all nestled in warm corn tortillas with fresh toppings.
Equipment
- Skillet
- Small bowl (for crema)
- Cutting board
- Knife
Ingredients
Shrimp
- 1 lb Large raw shrimp, peeled & deveined (≈ 450 g)
Taco Seasoning
- 2 Tbsp Unsalted butter
- 2 Tbsp Fresh lemon juice
- 1 tsp Zest of 1 lemon
- 1 tsp Smoked paprika
- ½ tsp Ground cumin
- ¼ tsp Chili powder
- ½ tsp Salt (or to taste)
- ¼ tsp Black pepper
Taco Components
- 8 (6-inch) Corn tortillas
- 1 cup Red cabbage, thinly sliced
- ½ cup Mango, diced
- ¼ cup Fresh cilantro, chopped
- ¼ cup Red onion, thinly sliced
- 1 medium Avocado, sliced
Creamy Topping
- ¼ cup Sour cream or Greek yogurt
- 1 Tbsp Lime juice (for crema)
- Pinch Salt (for crema)
- Hot sauce (optional)
Instructions
Prepare the Shrimp
- Pat shrimp dry and season with paprika, cumin, chili powder, salt, and pepper.
Cook the Shrimp
- Melt butter in a skillet over medium-high heat. Add shrimp and cook for 2-3 minutes per side until pink. Stir in lemon juice and zest, then remove from heat.
Warm Tortillas and Prepare Toppings
- Warm tortillas in a dry skillet or microwave. Prepare toppings like cabbage, mango, cilantro, onion, and avocado.
Assemble Tacos
- In a small bowl, combine sour cream, lime juice, and a pinch of salt for the crema. Load warm tortillas with shrimp, desired toppings, and a drizzle of the crema and hot sauce (if using).
Serve
- Serve immediately and enjoy your classic 20-minute lemon shrimp tacos!
Notes
For extra flavor, marinate the shrimp for 10 minutes before cooking. Adjust spice levels to your preference by adding more or less chili powder/hot sauce. These tacos are best served fresh.